
March 2020 – Google accounts are now required for Nest devices. This guide will not work. Ill leave it up for posterity though.
Nest products are becoming even more popular. I myself have a Nest thermostat and looking into getting some of their indoor cameras to act as a baby monitor as my daughter is old enough to be unleashed into her room without cot bars keeping her safe.
With the myriad of applications required to control all your home automation devices the idea of Apple Homekit is an intriguing one. It enables you to have everything in one place, accessible quickly. Alas, not everything is supported by Apple’s Homekit including Nest..
This is where homebridge comes in, it enables you to “bridge” the link between your Apple device and the devices which don’t support Homekit natively.
You can find my tutorial on how to install homebridge here.
Installation
1. From your device (Server, RasberryPi, Mac etc) you should run the following command:
sudo npm install -g homebridge-nest
This will install homebridge-nest. Make sure you use Sudo or you might get permission issues.
Thankfully thats all we need to do here.
2. We will need to set up a developer account with Nest directly to use their API.
3. Go to https://developer.nest.com
4. Sign in with your usual Nest ID.
5. Click Goto Console in the upper right corner.
6. From here you can create your developer account.
7. In step2 add:
Company Name: HomeBridge-Nest
Company URL: https://github.com/chrisjshull/homebridge-nest
Country: [Your Country]
Size of Company: Individual
8. Once your account is made you need to create a new OAuth Client.
You can use the below settings for this:
Product Name: HomeBridge + your name (must be unique)
Description: Open source project to provide HomeKit integration
Categories: Home Automation
Users: Individual
Support URL: https://github.com/chrisjshull/homebridge-nest
OAuth Redirect URL: [LEAVE BLANK]
OAuth Additional URL: [LEAVE BLANK]
Permissions:
Enable Thermostat with read/write v6.
Enable Other permissions Away with read/write v2.
Enable Smoke+CO alarm v5 with read (if you ever might want Nest Protect in the future)
Enable Camera v3 with read (if you ever might want Nest Cam, motion detection only for now, hopefully video comes soon.)
Permission description: fill in anything.
9. Click Create, now you should be brought to your OAuth client settings.
The site will show the below screen (my details have been edited out, you should see your unique identifiers here.
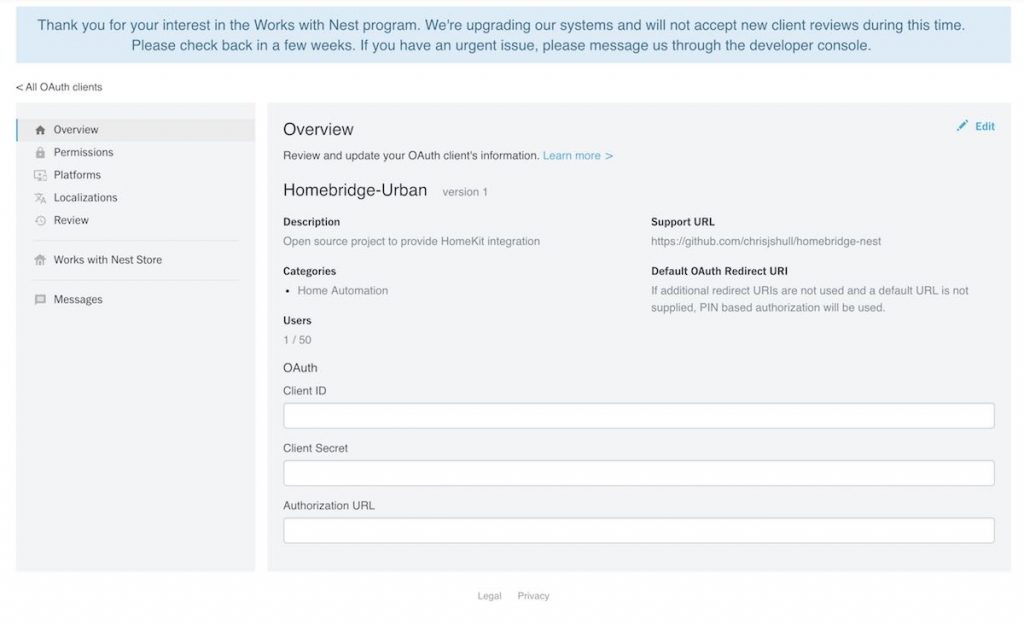
10. You will need to visit the Authorisation URL. Simply copy and paste it into your browser and accept the terms.
It will provide you with a code, remember this for later.
11. We need to add these configuration values into the config.json of homebridge. All the locations will be different hopefully you know where yours is!
Mine is /var/homebridge/config.json which is built on Ubuntu 16.04
The fields required in the config are as below:
“platform”: Must always be “Nest” (required)
“clientId”: developer Product ID
“clientSecret”: developer Product Secret
“code”: your Pincode from Nest
“token”: The only (and final) authentication piece you need to use the new API
{
  "platforms": [{

    "platform": "Nest",
    "clientId": "YOUR-CLIENT-ID",
    "clientSecret": "YOUR-CLIENT-SECRET",
    "code": "YOUR-PIN-CODE"
  }]
}
Once you’ve input your values you will need to run homebridge ONCE.
When homebridge starts it will give you a unique number which is can be used only once. The output looks like below:
“CODE IS ONLY VALID ONCE! Update config to use {‘token’:’c.5ABsTpo88k5yfNIxZlh…’} instead.”
Copy the c.5ABsTpo88k5yfNIxZlh… portion to your HomeBridge config as the token in the Nest config
So now your config should look like:
{
  "platforms": [{

    "platform": "Nest",
    "clientId": "d9614dbf-84fd531f**********",
    "clientSecret": "nG27i0n3ql*******",
    "code": "X8B*****",
    "token": "c.V9GyuLKlfsi3SLi4************"
  }]
}
Now all you have to do is restart homebridge and it should start with zero errors.
12. Enjoy Nest from your Apple Homekit screen 🙂